Copyright © 2020 Ashok P. Nadkarni. All rights reserved.
The Component Object Model (COM) is one of the most pervasive techologies in Windows. This chapter describes programming of COM components and clients using Tcl.
1. Introduction
Whatever we possess becomes of double value when we have the opportunity of sharing it with others.
The Component Object Model (COM) is a specification and architecture for binary interfaces between software components that
-
defines interfaces for sharing data and functions between independently developed components
-
allows for the communicating components to reside within a single process or in different processes on a system or even on different systems
-
is language independent
Many technologies in applications, as well as in Windows itself, are based on COM. Software developers writing libraries prefer COM because it allows their products to be used from multiple languages. Applications, such as Microsoft Excel, use COM as a means of integration with other applications as well to provide their functionality as a software component. The Windows operating system itself uses COM as the basis for providing services ranging from the desktop, such as the Windows shell, to system administrative services such as WMI and ADSI.
We will first describe the use of COM components from Tcl client applications. We will then describe implementation of COM components in Tcl so that they can be accessed from other applications. Finally, we will look more closely at some of the underpinnings of COM.
The sample code in this chapter requires the twapi_com package.
The tcom package is an alternative package with similar
functionality. We use twapi_com, firstly because of the author’s
familiarity with it and secondly because tcom will not run in
64-bit applications.
% package require twapi_com
→ 4.4.1
% namespace path twapi
2. COM concepts
2.1. Interfaces
A COM interface is a collection of related methods (operations) and properties (data), collectively referred to as members, that define a set of services or functions. The interface definition does not say anything about how these are implemented. For example, an interface definition for remote file access may define the operations that can be done on a remote file. There can then be multiple implementations that adhere to that interface definition but use different protocols like FTP, HTTP and so on, underneath.
2.1.1. IIDs
Interface definitions are uniquely identified by an interface identifier, IID, which is a 128-bit Globally Unique Identifier (or GUID). They also have an associated name but this is strictly for the purposes of human readability and not used internally by the COM infrastructure.
|
|
You can generate new GUID’s using either Microsoft’s
guidgen.exe tool or with the twapi::new_guid command
from the TWAPI package.
|
2.2. Coclasses
A coclass implements one or more COM interfaces. We will use the generic term class interchangeably with coclass.
2.2.1. CLSIDs
Like interface definitions, classes are identified by a GUID, referred to as its CLSID. However, unlike interfaces, classes only need to have an associated CLSID if instances of that need to be explicitly created by applications. A CLSID is not required where the instances are implicitly created as part of some other operation.
2.2.2. PROGIDs
Classes also have a human-readable name associated with them called a PROGID (for program identifier). Unlike CLSID’s, these are not guaranteed to be unique. However, the chances of conflict are relatively small and most applications, including our examples, use them for convenience.
You can translate back and forth between CLSIDs and PROGIDs.
% progid_to_clsid InternetExplorer.Application
→ {0002DF01-0000-0000-C000-000000000046}
% clsid_to_progid {{0002DF01-0000-0000-C000-000000000046}}
→ InternetExplorer.Application.1
2.2.3. Versions
Note the trailing integer in the return value from
clsid_to_progid in the above example. A component is also
associated with a version number, a single integer value. When a
new version of a class is released, the version number can be
incremented. However, note this does not give the liberty to the
class implementor to change the methods or properties of the
public interface if its CLSID remains the same.
2.3. Objects
A COM object is an instantiation of a COM class. Continuing our example, a COM object would represent a specific remote file. The data it encapsulates, such as file size, will correspond to the properties of that file and any method invoked on it will operate on that file.
2.4. COM applications
Ofttimes, multiple COM components implement related functions. These components need to share common settings for configuration of remote activation, security etc. To ease an administrator’s task of configuring each component separately, COM offers a mechanism for grouping components together as an “application”.
2.4.1. AppIDs
Each COM component is associated with an COM application by associating its CLSID with a GUID called an AppID. All common configuration information is stored with the AppID and shared by all the components.
|
|
Do not confuse “COM application” with “an application that uses COM”. The former is just a term used to refer to the grouping mechanism. |
2.5. Components, servers and clients
A COM component is a binary, either a DLL or an executable, that implements one or more classes. Servers host COM components and the applications that use their services are COM clients. COM servers are classified into three categories based on where they reside with respect to clients.
-
In-process servers load components implemented in dynamic link libraries and run in the same process as the client.
-
Local servers are components that execute in a different process on the same system as the client.
-
Remote servers execute on a different system from the client.
One of the features of COM is that a client need not be aware of the above scenarios. It makes use of the COM server component in the same way regardless.
2.6. Monikers
A moniker is an COM object that whose sole purpose in life is to identify another COM object. The object to be identified may be as simple as a specific file or a specific cell range in a specific sheet in a specific Excel workbook. Objects may themselves be hierarchical or composed from other objects. Monikers must work with all these cases and hence their function is not as simple as it might seem at first glance.
Moniker objects provide their functions through the IMoniker
interface. For our purposes, it suffices to know that:
-
monikers have a serialized string representation, called its display name, that uniquely identifies a COM object. For example, the string
winmgmts:Win32_Service='rpcss'uniquely identifies the WMI object corresponding to theRPCSSservice, and -
this string representation can be used to instantiate the named object.
2.7. Interface Definition Language
For compiled languages like C and C++, the code required on the
client side to access COM objects is generated from the definition
of the interface. This definition is written in the Interface
Definition Language (IDL). The midl compiler generates the
requisite C code (for example) based on the interface definition.
With scripting languages, these tools are generally not needed so
we will only occasionally refer to them in passing without going
into any details.
2.8. COM automation
Historically, the use of IDL compilers to generate source code for interfacing to COM components was not suitable for scripting languages like VBScript and Javascript for several reasons:
-
By their very nature, these languages do not have the compile/link step and any code generation would have to be done at run time. In addition to adding complexity to the scripting language, there was the fundamental problem that the MIDL file containing the interface definition is not something that is generally available with the COM component.
-
General COM interfaces are C/C++ based and may use arbitrary structures that have no suitable equivalents in the scripting language.
-
Programs in compiled languages are expected to be have a priori “knowledge” of any libraries or components they use. On the other hand, scripts are expected to be flexible enough not to have this requirement and to even work with COM components that will be released in the future.
To work around these issues, Microsoft created an interface
definition, IDispatch, along with rules to be followed by
COM components which would allow them to be invoked from scripting
languages. Collectively this technology has been known by various
terms such COM automation, ActiveX or simply the IDispatch
interface.
For the most part, scripting languages, including Tcl’s
twapi_com package, can only work with COM components that
support the automation interfaces. Fortunately, most COM
components that are not internal to an application and are
intended to be used by third parties support these interfaces.
This includes Microsoft’s Office applications as well as operating
system components like WMI.
|
|
This is a greatly simplified, not entirely accurate, summary of the subject but sufficient for our purposes. For example, scripts can access type libraries which contain a binary form of the information contained in an IDL file. |
3. Automation clients
Although using the IDispatch based automation
interface from compiled languages like C can be a little
cumbersome, it is very easily accessed from scripting languages
which hide most of the complexity.
We will illustrate COM automation using Internet Explorer which makes its functionality available through COM automation.
3.1. Instantiating an object
In the simplest case, we instantiate a COM object by passing
the PROGID of its class to the
TWAPI comobj command. This returns a Tcl object
that wraps the instantiated COM object. This wrapper object
exposes all the methods and
properties of the underlying COM object and in addition
implements some supplementary methods of its own.
|
|
To distinguish them from the methods and properties of the
underlying COM object, by convention supplementary methods
begin with the - character.
|
% set ie [comobj InternetExplorer.Application]
→ ::oo::Obj97
This will create a new instance of the Internet Explorer component.
You will not see an Internet Explorer window at this point but
if you look in the Windows Task Manager, you will
see an instance of the iexplore.exe process running if it was
not already there.
3.1.1. Attaching to an existing COM instance
The above example started a new instance of Internet Explorer and
created a COM automation object for it. Sometimes, you may need to
attach to an existing automation object. For example, you may
want to control an Excel application that the user has started.
In this case, passing the -active option to comobj will return
an automation object that is connected to the running Excel
instance.
set xl [comobj Excel.Application -active]For this to work, the component must already be running and must have registered itself in the Running Object Table maintained by the system. The Microsoft Office applications, for example, do this. In contrast, Internet Explorer does not.
3.1.2. Automation objects from monikers
Let us say we want an automation object which we can use to
manipulate a specific Excel file. One way to do this is to create
a new automation object using comobj Excel.Application and then
use its methods to load the Excel file of interest. This will in turn
return a new automation object whose methods can then be used to
manipulate the file.
A simpler way is to call the comobj_object command
with an argument that is a moniker
identifying the file. For files, the moniker string is simply the
full path to the file.
% set xlfile [comobj_object [file join [pwd] scripts sample.xlsx]]
→ ::oo::Obj99
% $xlfile Name
→ sample.xlsx
% $xlfile Path
→ D:\src\tcl-on-windows\book\scripts
% $xlfile -destroy
→ ::oo::Obj99
% $xlfile Name
→ sample.xlsx
% $xlfile Path
→ D:\src\tcl-on-windows\book\scripts
% $xlfile -destroy| A moniker is the full path to the file |
As usual, Windows figures out the application, or in this case, the COM component, to use to open the file based on the file extension.
|
|
The WMI chapter contains many extensive examples demonstrating the use of monikers. |
3.2. Working with properties
A COM object’s properties contain the publically accessible data
associated with the object. Internet Explorer has a property
Visible which contains its visibility status. Let us retrieve
it using the -get method on our COMOBJ wrapper.
% $ie -get Visible
→ 0
This explains why the window was not visible. Properties that are
not read-only can be modified so we turn on visibility using the
-set method.
% $ie -set Visible 1In practice, the -get and -set can be left out so the
following will also work.
% $ie Visible
→ 1
% $ie Visible 1
The only time that the -get and -set are required is when
there is ambiguity as to whether the referenced name, Visible in
this example, is a property or a method. COM automation provides
for separate namespaces for methods, property retrieval and
property setting functions. Thus the object could conceivably also
have a method called Visible. The -get and -set disambiguate
between property operations and method calls which are indicated
using -call.
However, this situation is rare and so in the vast majority of cases there is no need to disambiguate.
|
|
Using an explicit invocation like -get can be significantly
faster as the method namespace does not have to be
searched. However, because method and property look ups are
cached, this difference is mitigated in the case of repeated calls.
|
3.2.1. The default property
In languages like Visual Basic, an object can be invoked by
itself, i.e. without any method or property being specified.
This translates to a property of the object being returned that
has been marked as its default property. In Tcl, this default
property is retrieved using the wrapper object’s -default
method.
In the case of Internet Explorer, this default property happens to
be the Name property.
% $ie Name
→ Internet Explorer
% $ie -default
→ Internet Explorer
3.3. Working with methods
Methods are invoked in essentially the same manner that properties are accessed.
% $ie -call Navigate http://www.microsoft.comJust like in the case of properties, we almost never need to
specify -call and automation methods are case-insensitive so
% $ie navigate http://www.microsoft.comwould work just as well.
|
|
Although method and property names of COM objects are
case-insensitive, this is not true of the supplementary methods
supplied by the COMOBJ wrappers. Thus the -destroy method
cannot be invoked as -Destroy.
|
3.4. Call chaining
When working with COM, many a times you will need to access some object that is deeply nested within other objects. The intermediary objects have to be retrieved and discarded just in order to “navigate” to the target object.
For example, the following code fills an range in an Excel spreadsheet.
% set xl [comobj Excel.Application]
→ ::oo::Obj113
% $xl Visible true
% set workbooks [$xl Workbooks]
→ ::oo::Obj119
% set workbook [$workbooks Add]
→ ::oo::Obj124
% set sheets [$workbook Sheets]
→ ::oo::Obj129
% set sheet [$sheets Item 1]
→ ::oo::Obj134
% set cells [$sheet range a1 c3]
→ ::oo::Obj139
% $cells Value2 12345
% $xl DisplayAlerts 0
% $xl Quit
% comobj_destroy $cells $sheet $sheets $workbook $workbooks $xl| To disable user prompts |
In the above example, in order to get to the range we have to navigate through a hierarchy of objects, starting with the application, the workbook collection, a workbook within the collection, the worksheets collection, a worksheet within that collection and finally the cell range. After setting the value, all the created objects have to be deleted.
As an alternative, the COMOBJ automation wrapper provides
-with supplementary method to simplify this process:
% set xl [comobj Excel.Application]
→ ::oo::Obj146
% $xl Visible true
% $xl -with {
    Workbooks
    Add
    Sheets
    {Item 1}
    {Range a1 c3}
} Value2 12345
% $xl DisplayAlerts 0
% $xl Quit
% $xl -destroy
The first argument to -with is a list of methods or properties,
some of which may have parameters (like Item and Range).
Each method or property in the list is invoked on the object
returned by the previous one and should itself return a new
object. The argument after the list
(Value2 in this example) is the method or property
to invoke on the final object created with any additional
arguments being passed to it.
All objects created are automatically destroyed.
3.5. Parameters
Not only method calls, but properties as well, can take an arbitrary number of parameters. In the case of properties, these are actually indices into an indexed property but are passed in the same manner as method parameters and in this discussion we use the latter term to refer to either.
Passing parameters to methods is for the most part straightforward but there are a few special cases that we discuss here.
3.5.1. Input and output parameters
Method parameters may be
-
input only - the argument in the call is passed to the called method as an value
-
output only - the argument in the call is the name of a Tcl variable. The called method does not make use of the value of the variable which need not even exist at the time of the call. Instead it stores a value in the named variable before returning.
-
input and output - again, the specified argument must be the name of a Tcl variable. In this case however, the variable must exist and its value is used by the method. On returning, the method stores a new value in the variable.
Contents of output parameters are stored in a raw form and the
value has to be extracted with the variant_value command. There
are special considerations when the contained value is an interface
pointer to another object. See the documentation of the command
for details.
3.5.2. Optional parameters
A method definition may specify certain parameters to be
optional. These parameters can then be left out when calling the
method. The IDL definition for the Navigate method we used
earlier is shown below.
[id(0x00000068), helpstring("Navigates to a URL or file.")]
HRESULT Navigate(
                 [in] BSTR URL,
                 [in, optional] VARIANT* Flags,
                 [in, optional] VARIANT* TargetFrameName,
                 [in, optional] VARIANT* PostData,
                 [in, optional] VARIANT* Headers);
As seen, all parameters except the first are marked optional which was why we were not forced to specify them in our sample code.
Note however that in Tcl only trailing optional parameters can be omitted
from a call. So if you want to specify the URL and
TargetFrameName parameters to Navigate, you are forced to
pass Flags as well.
We discuss an alternative in the next section.
3.5.3. Named parameters
One solution to the above problem is to pass the parameters by
name using the -callnamedargs method of the wrapper object. This
is similar to the -call method we saw earlier but instead of
taking parameters in order, it accepts a list of alternating
parameter names and their values. The parameters may be specified
in any order.
% $ie -callnamedargs navigate targetframename "_top" url "http://www.xkcd.com"|
|
Notice that parameter names, like methods and properties, are also case-insensitive. |
This mechanism is very useful in cases where the methods have a large number of parameters of which only a few are useful for a given call.
How does one know the parameter names for a particular method call? We leave this for a later section.
3.5.4. Parameter types
At the C level, parameters are passed to COM automation methods in
a VARIANT union with the type being specified through a tag.
The possible types are shown
in COM automation base types[1].
The first two columns list the type’s C #define name and the
corresponding integer tag value for the type.
The third column gives
the corresponding type name for tclcast which is discussed later.
In addition, a parameter may be an array
(the SAFEARRAY type in COM) of any of the base types.
For the most part, callers do not have to be concerned with the type (boolean, integer, string etc.) of parameters passed to methods and properties. Type conversion is handled as necessary by looking up the type information for the parameter as described in a later section. However, there are some circumstances when explicitly dealing with type information becomes necessary:
-
there is no type information provided by the component for the method parameters. This is not uncommon.
-
the component implements an expando interface where properties can be dynamically generated
-
the method accepts multiple types for a parameter but exhibits different behaviour depending on the passed type
The second case is discussed in a later section.
An example of the last case would be a spreadsheet whose methods store
values in a cell as text or number depending on the type of the
passed value. In such a case, when passing a value 123
from Tcl, you might want to indicate that the value is to be stored
as text (string). In typed languages, passing the literal 123
versus "123" implicitly types the parameter. In Tcl, both literals are
treated the same so the type has to be explicitly specified.
For parameters that are scalar, the TWAPI tclcast command
can be used to pass parameters as specific types.
For parameters that are arrays, the TWAPI safearray
command can be used to construct a SAFEARRAY parameter of the
appropriate type.
3.6. Discovering properties and methods
When scripting an application via COM, how does one know what properties and methods are implemented by a component, the parameter types, default values and so on?
The obvious answers are to look up the component documentation or do an Internet search. For well documented and widely used components this is generally more than adequate but there are times when documentation is either unavailable or unclear[2]. In this case, there are two ways you can get hold of the interface definitions for a component including its methods and properties.
-
The
oleviewprogram that comes with the Windows SDK can display all possible detail about every component registered on the system including its IDL definition. -
The
-printmethod of aCOMOBJwrapper object will display the properties and methods of the underlying automation object in human readable form. This requires the automation object to have implemented certain interfaces that provide type information.
% $ie -print
→ IWebBrowser2
  Functions:
          (vtable 208) hresult Navigate2 1 ([in] variant* URL, [in optional] va...
          (vtable 212) hresult QueryStatusWB 1 ([in] OLECMDID cmdID, [out retva...
          (vtable 216) hresult ExecWB 1 ([in] OLECMDID cmdID, [in] OLECMDEXECOP...
          (vtable 220) hresult ShowBrowserBar 1 ([in] variant* pvaClsid, [in op...
          (vtable 224) hresult ReadyState 2 ([out retval] tagREADYSTATE* plRead...
          (vtable 228) hresult Offline 2 ([out retval] bool* pbOffline)
          (vtable 232) hresult Offline 4 ([in] bool pbOffline)
          (vtable 236) hresult Silent 2 ([out retval] bool* pbSilent)
...Additional lines omitted...
The output should be self-explanatory for the most part but a little discussion is in order.
-
The output lists all interfaces that the object supports.
-
For each interface, all methods and properties are listed.
-
Methods and properties are all implemented as function calls. The integer following the function name indicates whether the function implements a method (
1), a property retrieval (2) or a property set (4). NoteOfflineis a read-write property as there are entries for retrieval and setting whereasReadyStateis a read-only property. -
The
vtable NNNindicates the index of the function into the virtual dispatch table of the component. From our perspective, it has no real relevance. -
The return type of all functions is
hresultcorresponding to theHRESULTC type which indicates the status code from the call. At the scripting level, this is not visible when a call is successful. In case of errors, it is stored in theerrorCodeglobal variable and a Tcl exception is raised. -
The “real” return value from a function, if any, is indicated by the presence of the
retvalattribute on a parameter. The corresponding parameter is not actually to be passed as an argument to the command at the Tcl level. It is returned as the result of the command. -
Each parameter is marked with attributes that indicate whether it is input or output, optional, default values and so on.
|
|
The -print method can be particularly useful when you are not
sure of the type of object returned from a method which makes it
difficult to look up the documentation.
|
3.7. Destroying an automation object
Once you are done with a component, you can call the -destroy
method to release resources associated with the object. This
destroys the COMOBJ wrapper object and decrements the reference
count on the wrapped COM automation object.
This does not mean that if there are no
other references to the automation object its containing COM
server exits. For example with Internet Explorer, the Quit
method must be called else the process will continue running even
after the COM object is destroyed. This behaviour depends on the
specific component or application.
% $ie Quit
% $ie -destroy
Accessing a method or property on the object will now result in an error.
% $ie Visible
Ø invalid command name "::oo::Obj97"
3.8. Expando objects
In the original implementation of COM automation, the interface
IDispatch presented by an automation object was fixed at design time
(essentially by the defining IDL source). The interface members
could not be added or removed or renamed. Later on, in order to
support dynamic languages like Javascript, where members could
be added and removed at runtime, a new interface IDispatchEx was
defined which provided methods to accomodate these dynamic
requirements. Automation objects which support this new interface
are popularly known as expando objects.
From a Tcl scripting point of view, expando objects work like any other automation objects except for two issues that have to be kept in mind:
-
Since members may be added and removed at any time, callers must not assume that retrieving a property from an object means that property exists for the lifetime of that object. A future access may return an error indicating that the object has no such member.
-
The
-printmethod for the object wrapper will not list the dynamic members.
4. COM Collections
A COM collection is a special type of COM object that acts as a container for any number of items of a specific type, possibly even other COM objects. In addition, it provides standard methods, for accessing these items.
We demonstrate the use of these methods using the
Scripting.FileSystemObject, which is an automation object
implemented by the Windows shell. The same methods will work
with any COM collection object.
|
|
Using native Tcl or TWAPI commands such as file volumes
and get_drive_info is both simpler and more efficient. The
example here is just for the purpose of illustrating COM collections.
|
% set fso [comobj Scripting.FileSystemObject]
→ ::oo::Obj187
% set drives [$fso Drives]
→ ::oo::Obj192
The Drives method returns a COM collection, each item in which
is itself a Drive automation object corresponding to each
logical drive in the system.
The Count method returns the number of items in the collection.
% $drives Count
→ 2
An individual item in the collection can be retrieved through
the Item method.
% set cdrive [$drives Item "C:"]
→ ::oo::Obj198
% puts "Drive C: has [$cdrive FreeSpace] bytes free."
→ Drive C: has 37411368960.0 bytes free.
% $cdrive -destroy
Notice that the collection is indexed using the drive letter
(specifying C would have done as well) as the key. Depending on the
type of objects in the collection, the index may be some key that is
matched to each item, as in this case, or an integer position in
an ordered collection.
In our example, the collection contains automation objects but this is not always the case. A collection may contain integers, strings or any other automation type.
4.1. Iterating over a collection
You can iterate over all items in a collection with the
supplementary -iterate method of the automation object wrapper.
This works much like the Tcl foreach command,
looping over the collection, assigning each item to the specified
variable and invoking the supplied script.
% $drives -iterate drive {
    if {[$drive IsReady]} {
        puts "Drive [$drive DriveLetter] free space: [$drive FreeSpace]"
    } else {
        puts "Drive [$drive DriveLetter] is not ready."
    }
    $drive -destroy
}
→ Drive C free space: 37411368960.0
  Drive D free space: 828227203072.0
The COM automation object $drive is explicitly destroyed in
each iteration because it is no longer needed. Instead we could
have held on to it, for example by adding it to a list,
if we needed to access it later. Or instead of an explicit
-destroy, we could have used the -cleanup option to the
-iterate method to automatically destroy the created objects.
We have to remember to cleanup the collection itself.
% comobj_destroy $drives $fso5. Connectable objects and events
While most interaction with COM objects involves invoking their methods and accessing properties, it is also possible for interaction to go the other way, where the COM object calls back into the client code. The most commonly encountered case is that of an object notifying an application of events but other situations also arise where the object needs to retrieve data from the client or wants it to take some action.
These automation objects are called connectable objects. They define specific interfaces with methods that have to be implemented by the client. The automation object then invokes these methods asynchronously when it needs to interact with the client.
At the Tcl scripting level, the details of these interfaces and
how they are hooked up are (thankfully) hidden through a
simple callback mechanism using the -bind method of automation
object wrapper. The argument to -bind is a callback command
prefix to be invoked by the automation object. This command
prefix will be invoked by
the automation object wrapper with the name of the method
to be invoked and additional method-dependent parameters appended.
We will illustrate connectable objects through our old fiend friend Internet Explorer, which has the capability to send progress notification events to the application as it downloads a page.
For starters, our callback command will simply print the methods that the IE automation object is invoking in our client code. We can get away with just printing the arguments because the IE callbacks are just event notifications so it does not expect any action to be taken or data to be returned.
% proc print_ie_event args { puts $args }Notice that the parameter list is simply args since each
method IE calls has different number of parameters.
Let us start IE up and bind our callback command to the automation object. This will return a binding identifier which we need to use later to cancel the binding.
% set ie [comobj InternetExplorer.Application]
→ ::oo::Obj215
% set bind_id [$ie -bind print_ie_event]
→ 3
% $ie Visible true
→ OnVisible 1| A documented bug or feature of IE is that it will not send some notification events unless it is visible |
Navigating to a web page will result in IE sending us event
notifications or “progress reports” of each stage of the
operation. Receiving asynchronous notifications from any source in
Tcl requires the Tcl event loop to be running so we run the event
loop using wait.
% $ie Navigate2 http://www.google.com
→ PropertyChange {{265b75c1-4158-11d0-90f6-00c04fd497ea}}
  BeforeNavigate2 {1979570061992 IDispatch} http://www.google.com/ 256 {} {} {} 0
  DownloadBegin
  PropertyChange {{D0FCA420-D3F5-11CF-B211-00AA004AE837}}
% wait 2000
→ CommandStateChange 2 0
  CommandStateChange 1 0
  ProgressChange 0 10000
  StatusTextChange {Redirecting to site: https://www.google.com/?gws_rd=ssl}
  ProgressChange 0 10000
...Additional lines omitted...
Only required if running in tclsh and the event loop is not running. |
When no longer interested in the IE events, we must unbind from
the automation object using the binding identifier we obtained in
the -bind call. It is important to unbind before destroying an
object. Not doing so will cause an error exception to be raised.
% $ie -unbind $bind_idRunning the above example shows IE sends notifications for a lot of different types of events of which only a few might be interest to us. For example, let us assume only the navigation events were of interest to us. We could simply add a switch statement to the callback procedure but that can be unwieldy when there are a large number of event types.
So let us now add a little structure by definining a TclOO class for the purpose.
oo::class create IEHandler {
    method BeginNavigate2 args {puts "BeginNavigate2: [lindex $args 1]"}
    method NavigateComplete2 {dispatch url args} {puts "NavigateComplete2: \
        $url"}
    method unknown args {}
    export BeginNavigate2 NavigateComplete2
}
→ ::IEHandler
Note the following important points about our class definition.
-
We define a method corresponding to each notification method or event name of interest.
-
The names of the methods must match the names in the IE interface definition. While calling COM methods is NOT case-sensitive as we have seen, that is not true of Tcl itself. So while COM methods can be invoked in case-insensitive fashion, they must be defined in Tcl in the correct case.
-
The method name must be exported else it will not be visible outside the class. By default, TclOO only exports names that begin with a lower case letter so our methods must be explicitly exported.
-
IE will attempt to notify all events, not just those of our interest. We need to therefore define the special TclOO method
unknownas a “catch-all” which is empty and does not actually do anything. -
Because we now have a method for each event, we can either use
argsor explicitly name the method-specific parameters as shown in the example.
We then create an object of that class and bind it to our IE object. This time, just to be impartial, we will navigate to Bing.
% set bind_id [$ie -bind [IEHandler new]]
→ 3
% $ie Navigate2 http://www.bing.com
% wait 2000
→ NavigateComplete2: https://www.bing.com/
The use of TclOO or other object system greatly clarifies the event handling code as it gets more complex. With Tcl 8.5, which does not have TclOO built-in, you can use namespace ensembles with similar effect.
We are all done with IE for now, so we shall allow it to rest.
% $ie -unbind $bind_id
% $ie Quit
% $ie -destroy|
|
The WMI chapter contains other examples of COM event handlers. |
6. Implementing COM components
It is more blessed to give than to receive.
Up to this point, we have described how Tcl applications can make use of COM components. We now look at how COM components can be written in Tcl. Tcl COM components are always based on the automation interfaces.
To aid in understanding what is involved, we will first summarize the operations involved in instantiating and accessing COM components from a client application. Again, this is a hugely simplified view because much of underlying shenanigans are hidden when writing a COM component in Tcl. However, having some knowledge is helpful in understanding and troubleshooting in case of errors.
6.1. Installing a component
Before a COM component can be used by a client, it has to be installed or registered on the system. This registration consists primarily of setting values in the Windows registry that informs the SCM of the component’s name, location, type, invocation method and so on. This registration may be done by a specialized installation program but components are often self-registering.
The mechanism for self-registration depends on whether the component is implemented as a DLL, a self-standing executable or a service.
Self-registering DLL’s are usually registered and unregistered using with
the regsvr32 Windows program.
regsvr32 MYCOMPONENTDLLPATH; # Register components
regsvc32 /u MYCOMPONENTDLLPATH; # Unregister components
Self-registering server executables are registered or unregistered
by invoking them with a command line parameter /RegServer or
/UnRegServer respectively.
From Tcl, you can use the twapi::install_coclass or
twapi::install_coclass_script commands to install a COM
component. This is illustrated in our examples
later.
6.2. Locating a component
When a client attempts to instantiate a COM object, it passes the CLSID of the object’s class to one of several functions in the COM library. These in turn delegate the operation to the SCM. The SCM has to first locate the binary form of the requested component. It does this via entries in the Windows registry.
Information about COM components installed on a system is looked up
in the Windows registry under the HKEY_CLASSES_ROOT key. This
key is actually a merged view of two keys:
-
the
HKEY_LOCAL_MACHINE\Software\Classeskey which contains system-wide registration information -
the
HKEY_CURRENT_USER\Software\Classeskey which contains per-user registration information
COM registry keys shows some of the relevant keys.
Let us interactively simulate the lookup sequence for our Internet Explorer examples.
|
|
This is for pedagogical purposes only to illustrate what happens behind the scenes. Neither the client, nor the component, has to explicitly execute these in Tcl. |
First the CLSID corresponding to the IE PROGID is retrieved.
% set clsid [registry get HKEY_CLASSES_ROOT\\InternetExplorer.Application\\Clsid \
    ""]
→ {0002DF01-0000-0000-C000-000000000046}
% registry get HKEY_CLASSES_ROOT\\Clsid\\$clsid ""
→ Internet Explorer(Ver 1.0)
% registry get HKEY_CLASSES_ROOT\\Clsid\\$clsid\\ProgId ""
→ InternetExplorer.Application.1
Next, depending on whether the client application has indicated a
preference for in-process or out-of-process versions of the component, the
SCM retrieves the InprocServer32 and LocalServer32 keys.
% set ie_inproc_dll_path [registry get \
    HKEY_CLASSES_ROOT\\Clsid\\$clsid\\InprocServer32 ""]
Ø unable to open key: The system cannot find the file specified.
% set ie_outproc_cmdline [registry get \
    HKEY_CLASSES_ROOT\\Clsid\\$clsid\\LocalServer32 ""]
→ "C:\Program Files\Internet Explorer\IEXPLORE.EXE"
Note that Internet Explorer does not have an in-process version. If it did have one and the client preferences did not exclude in-process components, the SCM would load the DLL specified by the resulting path into the calling client process.
Since there is no in-process component of IE, the SCM will use the
out-of-process one. If there is already a process running that can
service the request, the SCM will pass the request to
it. Otherwise, it checks if the CLSID is associated with an
AppID which has a LocalService entry
specifying a Windows service that implements the component and
if so, passes the request to it. If none of these apply,
it will start one up using the command line
given by the LocalServer32 key or give up and fail.
|
|
The above description leaves out remote activation which we discuss later. We also leave out any discussion of surrogates, in-proc handlers and other material, primarily to prevent our collective heads from exploding, but also because these features are not available from Tcl. |
This resolves the question of how the SCM locates the component but still unanswered is how the SCM knows what function to call to actually create the requested object. The answer is that it doesn’t and that brings us to the next section.
6.3. Class factories
Since the SCM does not know the specifics of how a particular type of COM object is created, it has to somehow ask the component itself to do this task. For each class that it implements, the component must also implement a class factory, a special type of COM object that “knows” how to create objects of a specific class. So to create an object of the type that the client has requested, the SCM simply has to ask the object’s class factory to create one.
We have of course only postponed the problem. Instead of figuring out how to instantiate the client-requested COM object, the SCM now has to figure out how to instantiate the class factory object. It does this by asking the component itself to register with the SCM, the class factories for all classes supported by the component.
The mechanism for doing this depends on whether the component is an in-process component or an out-of-process component.
-
In the case of a in-process component, after loading the DLL into the client process, a special entry point in the DLL,
DllGetClassObjectis called with the CLSID of the class originally requested by the client.DllGetClassObjectthen returns a pointer to a class factory for objects of that type. TheCreateInstancemethod of the class factory is then called to create the object the client requested. The class factory may then be either disposed of, or retained for future calls to create objects of the same type. -
In the case of out-of-process components, a command line parameter
/Embeddingis passed to the process. When this parameter is present, the executable component must register with the SCM pointers to class factory objects for all classes it supports. Just as in the in-process case, theCreateInstancemethod of the appropriate class factory is then invoked to create objects as and when needed. Since components implemented using thetwapi_compackage are always out-of-process components, we will look at this in detail in our sample code.
6.4. Method calling mechanism
We now look what is required for the client process to access a method or property of the COM object once it is created.
In the case of a COM object that is not an automation object, methods and properties defined for an interface are mapped to functions accessed through a table. This happens as part of the process of compiling the IDL file that contains its definition. In the case that C++ is the implementation language, this table of functions is the virtual table of the implementing C++ class. When an object is created by a factory, the returned pointer for the object points to a structure whose first field is a pointer to this table. The client code then calls methods by indexing into this table.
|
|
This description really only holds for in-process components. For out-of-process components, the client code actually accesses the object through a proxy object which marshalls the data back and forth between the two processes. However, for the purposes of our discussion this is irrelevant. |
Things are a little different in the case of a COM object that is
an automation component. Unlike the previous case, where the table
and contained functions were both different for different classes
and interfaces, all automation objects implement and present the
same interface (the famous IDispatch interface). All method
calls are made through the same entry, Invoke, in the
corresponding function table. How does the component know which
real method the client wants invoked ? The answer is that the
client passes in an integer value, called the DISPID,
representing the name of the
method and the component’s Invoke implementation “dispatches”
(hence the name IDispatch) the call based on this value. And how
does the client know what DISPID to pass in for a particular
method? It can either ask the component directly using another
call, GetIdsOfNames, in the IDispatch interface or it can get
it from the component’s type library
if it has one.
When working with COM automation from Tcl, this is for the most part all hidden. However, there are a couple of rules to be kept in mind regarding the mapping between DISPID values and method names. We will discuss these when we (eventually) get around to actually writing a automation server.
6.5. Component clean-up
The final aspect we have to look at is shutting down the component when there are no active clients for the objects (including factories) running in the component. Every object maintains an internal count that tracks how many references to it are outstanding. This count is co-operatively maintained between the client and object implementation (again hidden at the scripting level). When the internally maintained counts indicate that no objects or factories are in use, a component can free up its resources.
In the case of an in-process component, the containing DLL can then
be unloaded. In the case of an out-of-process component, the containing
process can then exit or optionally continue running. For example,
the Microsoft Excel automation object will continue running until
there is either an explicit Quit method call or the
the user exits the application.
6.6. Implementing an automation component
We are now ready to implement a component in Tcl and since at this point you are practically an expert in COM technology, this should be a breeze! And it is.
Our component is a script which will be run “on-demand” by the SCM. It implements a single COM class that will represent a bank account.
We will need the TWAPI package.
package require twapiWe define the CLSID and PROGID of the COM class. We also define the map between the integer DISPID values and methods names as described earlier. Once a component is published, the CLSID must be always refer to this exact interface.
We also define the AppID and the application name for the component. We will have no use for it right now, but will need it when we discuss COM remoting and security.
|
|
Defining an AppID is not strictly necessary even for remoting. It will default to the CLSID of the component. However, explicitly defining the AppID allows multiple components to be grouped and configured with common security settings. |
set config {
    clsid  "{BEBFAC7C-B178-4479-B63B-EF5C6E47B600}"
    progid "TclBook.Account"
    version 1
    dispids  {0 initialize 1 balance 2 withdraw 3 deposit}
    appid "{21A2B878-5A93-49C0-8ECB-2D34D7A5971E}"
    appname "TclBook Bank Account"
}
The implementation using TclOO is shown below and is more or less the same as that described in the Object Oriented Programming chapter. Note that this is purely an implementation choice. As mentioned earlier, we could have implemented the COM class in any manner we like, using a different OO framework, as a namespace ensemble or whatever.
oo::class create Account {
    variable AccountNumber Balance
    method UpdateBalance {change} {
        set Balance [expr {$Balance + $change}]
        return $Balance
    }
    method initialize {account_no} {
        puts "Reading account data for $account_no from database"
        set AccountNumber $account_no
        set Balance 1000000
    }
    method balance {} { return $Balance }
    method withdraw {amount} {
        return [my UpdateBalance -$amount]
    }
    method deposit {amount} {
        return [my UpdateBalance $amount]
    }
}
One notable difference in this class definition compared to the one
in the Object Oriented Programming chapter is that the
object is explicitly initialized through the initialize
method. There is no implicit constructor mechanism in COM, so the
client application has to make an explicit initialize call to
specify the account that the object should represent.
We will need to define an background error handler for any errors that are reported asynchronously by method calls. Here we will log the error to the Windows event log. This default handler is installed only when we are actually running as a component server.
|
|
The default background error handler in wish will show a dialog box
to the user. When running under a different account or remotely,
there is no associated desktop on which the dialog can be seen and
dismissed. The process will not exit if such a dialog is exists
even when all clients have disconnected. Therefore it is important
to replace the default handler.
|
proc background_error_handler {msg error_dictionary} {
    variable config
    twapi::eventlog_log "[dict get $config progid] error: $msg" -type error
}
We next define a proc for running the component:
-
It first creates a class factory for our class using
comserver_factory. The parameters specify the CLSID of the class of the objects that factory will be create, the DISPID map, and the command prefix that should be used create new objects of the class. -
Next it asks the factory to register itself with the SCM. From now on, whenever there is a request for a
TclBook.Accountobject, the SCM knows to pass on the request to our component. -
We then “turn on” all factories in the component (in our case, we have only one) using
start_factories. This command will also run the Tcl event loop so as to service requests from the SCM and COM clients. It will only return when all created COM objects are no longer referenced by clients and the SCM has no use for any of the registered factories. -
Once
start_factoriesreturns, we are free to destroy our factory. This informs the SCM and releases resources. At this point, if a client creates a newTclBook.Accountobject, the SCM will start a new process to handle the request.
proc run {} {
    variable config
    interp bgerror {} background_error_handler
    set factory [twapi::comserver_factory [dict get $config clsid] [dict get \
        $config dispids] {Account new}]
    $factory register
    twapi::start_factories
    $factory destroy
}| Sets the background error handler |
We have defined everything we need to but there are a few final considerations to take into account:
-
we need to install the component. This is not strictly necessary because we could do it with an installation program or a registry
.regfile. However, in addition to the/Embeddingparameter described earlier, by convention an out-of-process executable component is expected to install and uninstall itself when passed the parameter/RegServerand/UnregServerrespectively. This is easy enough to implement using thetwapi::install_coclassandtwapi::uninstall_coclasscommands. -
We can use either
wishortclshto install the component. However, to run the component when called from the SCM, we will usewish. This is because Windows console programs liketclshwill result in a new console window when they are run. Even though we can hide it, it will result in an annoying flash.wishwill also create a new window, but we can hide it before it is displayed usingwm withdraw.
When constructing the command that the SCM calls to execute the component
process, we will use the file attributes command to convert all
paths used in the command to their short 8.3 versions. This is to avoid
having to deal with quoting issues when there are spaces or other special
characters in the paths.
catch {wm withdraw .}

set ::argv [lassign $::argv command]

switch -exact -nocase -- $command {
    -embedding -
    /embedding {
        run
    }
    -regserver -
    /regserver {
        dict with config {
            twapi::install_coclass_script $progid $clsid $version [info script] \
                -scope system -appid $appid -appname $appname
        }
    }
    -unregserver -
    /unregserver {
        twapi::uninstall_coclass [dict get $config progid] -scope system
    }
    default {
        error "Unknown command. Must be one of /regserver, /unregserver or \
            /embedding"
    }
}

exit 
| When running with wish, hide the main window which is automatically created | |
When running as a component we need to explicitly exit else wish will keep running |
And there you have it. A COM component in just a few lines of code. No need for understanding or writing IDL files or any additional compiler tools. Here is the full listing.
# comaccount.tcl
package require twapi

set config {
    clsid  "{BEBFAC7C-B178-4479-B63B-EF5C6E47B600}"
    progid "TclBook.Account"
    version 1
    dispids  {0 initialize 1 balance 2 withdraw 3 deposit}
    appid "{21A2B878-5A93-49C0-8ECB-2D34D7A5971E}"
    appname "TclBook Bank Account"
}

oo::class create Account {
    variable AccountNumber Balance
    method UpdateBalance {change} {
        set Balance [expr {$Balance + $change}]
        return $Balance
    }
    method initialize {account_no} {
        puts "Reading account data for $account_no from database"
        set AccountNumber $account_no
        set Balance 1000000
    }
    method balance {} { return $Balance }
    method withdraw {amount} {
        return [my UpdateBalance -$amount]
    }
    method deposit {amount} {
        return [my UpdateBalance $amount]
    }
}

proc background_error_handler {msg error_dictionary} {
    variable config
    twapi::eventlog_log "[dict get $config progid] error: $msg" -type error
}

proc run {} {
    variable config
    interp bgerror {} background_error_handler
    set factory [twapi::comserver_factory [dict get $config clsid] [dict get \
        $config dispids] {Account new}]
    $factory register
    twapi::start_factories
    $factory destroy
}

catch {wm withdraw .}

set ::argv [lassign $::argv command]

switch -exact -nocase -- $command {
    -embedding -
    /embedding {
        run
    }
    -regserver -
    /regserver {
        dict with config {
            twapi::install_coclass_script $progid $clsid $version [info script] \
                -scope system -appid $appid -appname $appname
        }
    }
    -unregserver -
    /unregserver {
        twapi::uninstall_coclass [dict get $config progid] -scope system
    }
    default {
        error "Unknown command. Must be one of /regserver, /unregserver or \
            /embedding"
    }
}

exit
To make sure the component actually works, we need to first install it.
d:\src\tcl-on-windows\book> tclsh scripts/com/comaccount.tcl /regserver
Let us try it out and see if returns the correct results.
% set account [comobj TclBook.Account]
→ ::oo::Obj231
% $account initialize A-001
% $account Balance
→ 1000000
% $account withdraw 1000
% $account -destroy| Note COM method calls are case-insensitive |
Voila! There we go. And any suspicious souls who are not convinced we are using COM, can run the VBscript below.
' comaccounttest.vbs
Set obj = CreateObject("TclBook.Account")
obj.Initialize("B-001")
Wscript.Echo "Balance is " & obj.Balance & "."
d:\src\tcl-on-windows\book> cscript scripts/com/comaccounttest.vbs → Microsoft (R) Windows Script Host Version 5.812 Copyright (C) Microsoft Corporation. All rights reserved. Balance is 1000000.
Now that we have our irrefutable proof that it actually works, we can uninstall the component so as to not clutter up the registry.
d:\src\tcl-on-windows\book> tclsh scripts/com/comaccount.tcl /unregserver
We finish our illustration with a couple of comments about the script structure.
-
When running as a component, servicing client and SCM requests, the script needs to be running the Tcl event loop. The
start_factoriescommand does this internally and only returns when there are no external references to objects or factories. Alternatively, you can passstart_factoriesa callback command that it will invoke when all external references are gone. In this case, thestart_factoriescommand returns right away and it is up to you to run the event loop (which in the case ofwishis running anyway) and then take appropriate action on the callback. See the TWAPIstart_factoriesdocumentation for details. -
Irrespective of which of the above methods you choose, the application need not exit after the factories are destroyed. For example, if it displays an interface to the user (like the Office suite), it may may continue to run until some user action such as selecting the
Quitmenu item.
If you take a close look at the component source code that we implemented, you will see it takes very little code to expose Tcl as a COM object to other applications. There is not even any IDL required. Very few languages make it so simple to write components.
|
|
A cautionary note is in order. Using IDL instills some sense of formality that prevents interfaces from being changed. Modifying Tcl-based COM components is so easy it can be tempting to change an interface in a “published” class. Do not do this. Any such externally visible changes must be accompanied by a change in the CLSID. (Internal changes that do not change the public interface are acceptable.) |
There are also some limitations in components implemented using
Tcl and the twapi_com package. They can only run as out-of-process
components which has an impact on performance compared to in-process
implementations. (However, this is true for most dynamic
languages, not just Tcl). Also, the components only support the
automation based interfaces. This limits their use in some
situations like Windows Shell plug-ins which require in-process
implementations using custom interfaces (not based on automation).
7. Distributed COM
One of the notable features of COM is that clients and components do not even need to be on the same system. Even more impressive is the fact that the component need not be even aware that the client is remote and does not need to be written any differently. So our sample component from the preceding section can be accessed remotely without any coding changes on our part. This technology is known as Distributed COM (DCOM) and described in this section.
|
|
This section focuses on how components are located and activated. The all-important discussion of security is left for the next section. |
When instantiating remote objects, the sequence we described in a previous section for locating a local component takes a slightly different path. Instead of looking up the registry locally, the SCM contacts its counterpart on the remote system using RPC over TCP port 135[3] and delegates to it the task of locating the component. The remote SCM then follows the same steps described for the local case to instantiate the requested object. If the object is implemented as an out-of-process component, the remote SCM will fire up the process (if it is not already running). In the case of in-process components, the SCM starts what is known as a surrogate process whose sole purpose in life is to host the component DLL on behalf of the client.
A separate RPC connection on a random port is then established between the COM libraries on the client and the instantiated COM object. Note that this is important for a discussion of security in the next section. All method calls made by the client are then marshalled and sent across to the object over this connection.
A client application may of course interact with multiple objects within within a component. The above description refers to instantiation of the first object. Other objects will share the connection provided they have the same security settings. Even for a given object, new connections may be created if security settings are dynamically changed.
|
|
It is critical that the Windows firewall be configured to permit RPC network traffic. Refer to the troubleshooting section. |
Obviously, the component has to have been installed on the remote system before it can be activated remotely. However, there is no magic involved; the component is installed in the same fashion as described earlier. Remote activation of an object can then be done in two ways:
-
through an explicit request from the client application, or
-
through a registry configuration setting
We discuss the two alternatives in turn below.
7.1. Remote activation based on client request
When instantiating a COM object, a client can request
the object be activated or instantiated on a specific remote system.
From Tcl this is done by specifying the -system option to the
comobj command.
set account [comobj TclBook.Account -system VM1-WIN8PRO]This is all that is required assuming
-
the remote system is configured to allow remote access, something we discuss in the next section, and
-
the default credentials of the current process have the requisite permissions on the remote system.
Note the server need not even be aware that the client is remote.
|
|
In order to use the component PROGID
TclBook.Account as in the above example, the component has to be
registered on the client system. However, this is not strictly
necessary. If you know the CLSID of
the component, you can pass it to comobj in place of the
PROGID. In that case, the component does not even have to be
installed locally.
|
7.2. Remoting via the registry
Administrators can also configure the system (through the
ubiquitous registry) such that a request is satisfied by a remote
component even without the client requesting it. In this case,
even the client is not aware that the server is located on a
different system. This is done through the dcomcnfg program
as described in Component configuration example
or by directly creating a registry value with
name RemoteServerName under the key
\Software\Classes\AppID\APPID where APPID is the
AppID of the component. The value of
RemoteServerName should be the name of the remote server. Now
even a simple instantiation command
set account [comobj TclBook.Account]will result in the object being created on the remote system, unbeknownst to the client.
|
|
There may be times where a client application wants to ensure a
component is local, for security reasons for example, irrespective
of the registry setting. The -model option to comobj allows it
to choose any combination of in-process, out-of-process, local and
remote instantiation options.
|
When using the registry method, the component must be “installed” on the client system. Essentially, this means the binaries need not be present but the corresponding registry entries have to be there so that component CLSID can be mapped to the appropriate APPID.
8. COM security
We spend our time searching for security and hate it when we get it.
We can no longer avoid a discussion of COM security and must do so, even at the risk of having our collective heads all explode. Actually, the topic is conceptually not unduly complex and much of it is anyways hidden by the Tcl libraries. So you can feel safe in reading this section. It is only when you need to troubleshoot and debug access failures that a tight wrap around your head is well advised.
The practical difficulties in configuring and troubleshooting arise primarily because of the number of different entities and their settings involved in a COM interaction. All of the following can impact access:
-
The component’s COM settings on the server
-
The inherited default COM settings on the server
-
Additional settings that control which of the above take precedence
-
Local and Group Security Policy settings
-
The account under which the server component is running
-
The account under which the client is running
-
Programmatic control which can modify some but not all of the above
-
Whether access is local or remote
-
The transport over which the COM interaction is taking place
-
The authentication mechanism being used
-
The Windows firewall
We will first describe the concepts related to COM security and describe the related configuration settings. We will then go through the changes required to the code we have outlined in this chapter, which are thankfully minimal. Only the most common settings and configurations are described here. For full details, please refer to the Security in COM section of the Windows SDK documentation.
All security related configuration is done through
the same application id or AppId
we saw earlier that is used to collect configuration settings for
one or more related components.
Unless stated otherwise all registry values referenced in this
section are located under the
HKEY_CLASSES_ROOT\Software\Classes\AppID\APPID
registry key.
|
|
Although we list the specific registry entries here, these are
generally not directly configured through the registry editor.
Rather, in the usual case where security settings for a COM
server are being configured, the dcomcnfg.exe program is used to
edit these in consistent fashion as we show later. In the less
common case where a client security settings are being configured,
you will have to explicitly generate an AppId for the client and
explicitly set the registry keys.
|
8.1. Identity control
Like for any other secured resource, security for COM can require a client that is attempting to access a COM server to prove its identity. Less commonly, the client may also need to authenticate a server, for example before it passes on sensitive data. COM security allows for both sides to verify each other’s identity.
There are various facets to this aspect of security that we discuss here.
8.1.1. Server identity
You can configure the account under which a COM server process runs when launched in response to a client request. The various possibilities are listed in this section.
Running as the interactive user
In this configuration, the server runs under the account for the user who is currently logged in to the system on which the server is being launched. This entails several security risks and is not recommended. Moreover, the server cannot be launched if no user is interactively logged on. The only reason for a component to be configured in this manner is if it has a user interface that needs to be displayed to the user as other configurations do not permit this.
To enable this configuration, the RunAs value in the registry
configuration must be set to the string Interactive User.
Running as a specific user account
In this configuration, the server component is always run under the credentials of the configured account. All client requests are served by the same server process and any resource access by the server is done with the configured account’s credentials.
To enable this configuration, the RunAs value in the registry
configuration must be set to the name of the user account. In
addition, the following conditions must be met or the server will
fail to start.
-
The
dcomcnfg.exeprogram must be used to establish the password for the account. -
The account must have the
Logon as as a batch jobright. This can be done using the Local Security Policy MMC snap-in or even programmatically from Tcl as follows:twapi::add_account_rights ACCOUNTNAME [list SeBatchLogonRight]
The account name can be in the form USERNAME or
DOMAIN\USERNAME.
The special built-in accounts
Local Service, Network Service and System can be
specified as nt authority\localservice,
nt authority\networkservice and nt authority\system
respectively. For these built-in accounts, the password must be
specified as the empty string on Windows version prior to Vista.
On Vista and later versions, the password for these built-in
accounts need not be specified.
|
|
Use of the System has a special caveat. This account can only be
used with COM servers that are already running. It cannot be used
with COM servers that need to launched on a client request.
|
Running as a service account
A COM server can also run as a Windows service. In this case, the account under which the server runs is that associated with the service. The service must have been installed as described in the Windows Services chapter.
This configuration is indicated by the presence of the
LocalService registry value with its content being the name
of the service implementing the COM component. We saw this in
an earlier section.
|
|
Do not confuse the LocalService registry value with the
nt authority\localservice account.
|
The registry value ServiceParameters can be used to specify
additional parameters to be passed to the service when it is
started.
Running as the launching user
If none of the above configurations is set, by default the COM server process is run under the account of the requesting client process. Each client connection results in the server being run in a separate process with an impersonation security token corresponding to the client.
8.1.2. Client identity and impersonation
There are times when a client needs to be able to control the identity it presents to the server as well as how that identity can be used. An example of the former would be access to a resource on the server being permitted only to specific user accounts. An example of the latter is a highly privileged client needing access to a resource on the server without allowing the server to access other secured resources while pretending to be the client.
By default, when a client connects to a server it is authenticated using the credentials of the account under which the client process is running. If this is not what is desired, other credentials can be specified instead. As we will see later when we work through examples, alternative credentials can be specified
-
at initialization on a process wide basis to be used for all COM interactions
-
at the time a COM object is instantiated
Once a client is authenticated, a COM server may choose to take on its identity when accessing resources via impersonation. Impersonation is discussed in detail in a separate chapter but in a nutshell, this means that the access control checks for the resource are done using the client’s credentials. This ensures that a less privileged client cannot get access to protected resources even if the server is running under a privileged account.
Impersonation levels
Conversely, the client may also want to limit how the server can use its credentials. For example, it may not want the server to be able to impersonate it when accessing other resources on the network. The extent to which the server can impersonate the client is defined by impersonation levels and can be specified by the client when connecting to the server. The possible levels and their semantics are shown in COM impersonation levels.
8.2. Authentication levels
COM defines authentication levels that specify the level of protection of communication between client and server. This protection includes
-
authentication to ensure that the communication is really from the expected remote party and not some spoofer, and that the data has not been tampered and modified in transit
-
encryption to ensure privacy of the communication
The various levels of authentication are shown in COM authentication levels in ascending order of the protection they provide.
If you are worried about security (and you always should be) only one of the top two levels should be configured depending on whether privacy of data is a concern or not.
8.3. Authentication services
The security features that protect a COM interaction may be implemented via different protocols implemented by various authentication services. The security package providers that provide these services and the features they support are shown in Authentication service provider.
| Package | Description |
|---|---|
|
Specifies no security services are required. Neither the client
nor the server can authenticate the other and only the |
|
Implements the NTLM protocol. Supports all authentication levels and always allows the server to verify the client identity. Verification of server identity is only supported when client is co-located on the same system as the server. |
|
Implemented with the Kerberos V5 protocol and generally used in an Active Directory or domain environment. Supports all authentication levels and mutual authentication (even remotely). |
|
Implements the SSL/TLS family of protocols. Not discussed further here it is not supported as a COM transport by TWAPI. |
|
Implements the Snego protocol that negotiates a suitable
protocol (generally |
8.4. Activation and call security
Let us revisit our earlier discussion of Distributed COM. As we described there, instantiating a remote object involves two separate negotiated connections:
-
First, the remote SCM is contacted to locate and launch the COM server on the remote system. Activation security refers to the security attributes associated with this connection. This includes the negotiated security settings for the connection itself as well as access control that determines whether the client is allowed to launch the COM server or not.
-
Once the remote COM server is launched, a separate connection is made to it from the client process. Call security refers to the security attributes associated with this second connection. Again, these include the seecurity settings for the connection itself as well as which objects and methods can be accessed by that client.
Clearly, before the server is actually
running, it cannot programmatically control what clients invoke
it. Thus activation security is configured purely outside of the
COM server itself via settings in the Windows registry.
An administrator uses a tool,
usually dcomcnfg.exe, to configure these permissions.
Call security can also be configured in this fashion
but the difference is that since the component is now already
activated and running, it can itself programmatically configure
the security on its connection as well as control access to its
hosted objects.
8.5. Access control
A COM server can control access to its objects and even object methods using the native Windows access control mechanism described in the Windows Security chapter. This takes the form of one or more security descriptors that define which accounts can access the protected object or method.
Access control can be configured through the registry
(usually using dcomcnfg.exe) or programmatically by the
COM server. In the latter case, the access control can be done
through a single one-time call that controls access without any
more explicit checks on incoming method invocations, or explicitly
for every object and method by checking the client identity
against the security descriptor(s) using the access control API’s.
8.6. Authorization
Although COM defines the notion of authorization, none of the implemented security providers, NTLM, Kerberos, or Schannel support it. We do not discuss it further here.
8.7. Security blanket negotiation
The term security blanket refers to the entire set of security attributes associated with one or more COM connections proxies in a process. These include authentication services and levels, identities, impersonation levels and access control lists.
This security blanket interaction is negotiated between the client and the server at the time the transport connection is established between the two. The proposed parameters for the negotiations may come from system defaults set in the registry, component specific settings in the registry, programmatically set by a process for all COM connections in the process, or programmatically set for each connection.
The actual process of negotiation is somewhat involved but in a nutshell, it results in a security blanket composed of
-
an authentication service that works on both the client and the server
-
identities based on the selected authentication service
-
an authentication level that is the more secure one of the levels proposed by the client and server
-
the permitted impersonation level and cloaking settings are that selected by the client
Note as an aside that the access control settings are not actually negotiated but are simply enforced on the server side.
|
|
Earlier we distinguished between activation security and call security. The security blanket is negotiated separately for each. When working with the raw COM API, this can lead to some difficulties but fortunately, this is mostly hidden at the Tcl level. Nevertheless, it is worth keeping this in mind when debugging or troubleshooting. |
8.8. Configuring secure access
If you are still reading at this point, clearly your head is happily intact and we can look at how COM security is implemented by working through a couple of examples.
In the first example, we will use the component we developed earlier and show how it can be accessed remotely in secure fashion purely through system configuration and without any changes to the component code.
In the next section we will illustrate a second, little more sophisticated example with impersonation and access control where both configuration-based and programmatic mechanisms will be utilized.
8.8.1. Starting dcomcnfg
Although COM configuration can be done by editing the registry,
the safer and more common way is to use the dcomcnfg.exe program
that comes with all Windows versions.
Starting this program will
bring up the window shown in Main window for dcomcnfg.
|
|
The user interface for dcomcnfg differs a little between different
operating system versions and may not exactly correspond to the
image shown. The described functionality however is always present.
|
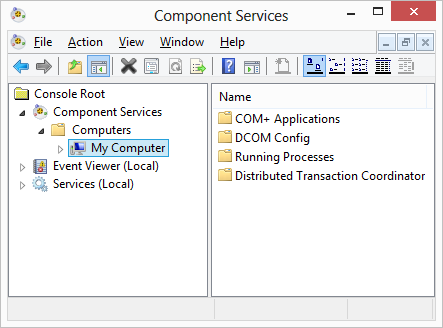
Configuration related to COM appears under the
Component Services tree node in the Microsoft Management Console
(MMC). Since MMC can in fact connect to
remote systems with the appropriate credentials,
multiple systems may be listed under Computers. In our case, we
assume that we are running dcomcnfg on the remote system where
the COM server is located.
8.8.2. Enabling remote access
Before a system permits remote access to any component, DCOM
must be enabled on the system. DCOM is enabled by default on
Windows but to verify, we bring up the Properties dialog by
selecting the My Computer node in the dcomcnfg window
and clicking the
menu item. This will bring up the
Properties dialog shown in
DCOM defaults property page.
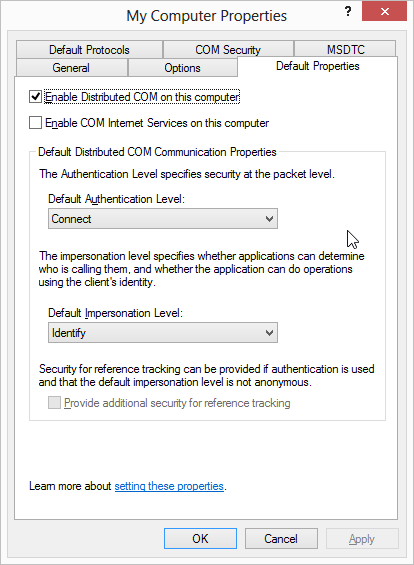
To allow any component on the system to be accessed remotely, the Enable Distributed COM on this computer checkbox must be selected in the Default Properties tab in the dialog as shown.
8.8.3. Setting authentication and impersonation level defaults
The same property page is used to configure system-wide defaults for security blanket negotiation.
As mentioned earlier, components can be accessed remotely even if they have not been written with that capability in mind. In such a case, the system uses defaults when negotiating the security blanket for access to the component. These defaults can be component-specific as we see later, but for most cases setting the system-wide defaults is adequate and much simpler from a management point of view.
The related dropdowns in this tab are
-
the Default Authentication Level: dropdown which allows selection of one of the valid authentication level values
-
the Default Impersonation Level: dropdown which allows selection of one of the valid impersonation level values
We do not want to change system-wide settings for demonstrating our example so we will leave these unchanged.
8.8.4. Setting access control defaults and limits
Just as for authentication and impersonation level settings, system-wide defaults can also be set up for access control. This is done through the COM Security tab in the same dialog as shown in System-wide COM security dialog.
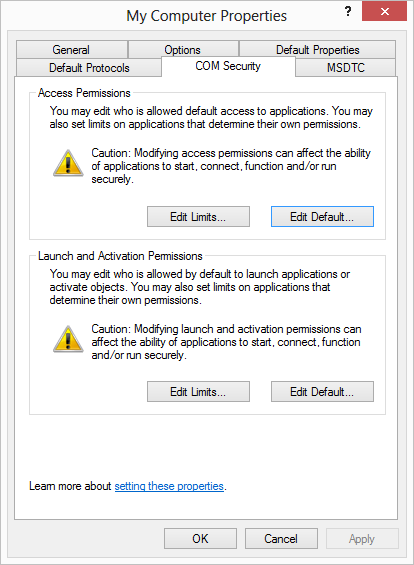
The Access Permissions section and the Launch and Activation Permissions section respectively control settings for call security and activation security discussed earlier.
Each section has two buttons, Edit Limits… and Edit Default…, which bring up dialogs for configuring access control.
The Edit Default… button is used to configure the access control settings that are used if no component-specific setting exists. The Edit Limits… button, which is not present in older versions of Windows, has a different purpose. It allows an administrator to set a system-wide ACL irrespective of any component-specific setting that might exist. Client access to a component is not permitted if it is not allowed by this ACL even if the component’s ACL or the system default ACL allows access.
|
|
The Edit Limits… button may be greyed out if group policy settings are in effect. |
Clicking the Edit Limits… button in the Launch and Activation Permissions section brings up the ACL window shown in COM launch limits dialog.
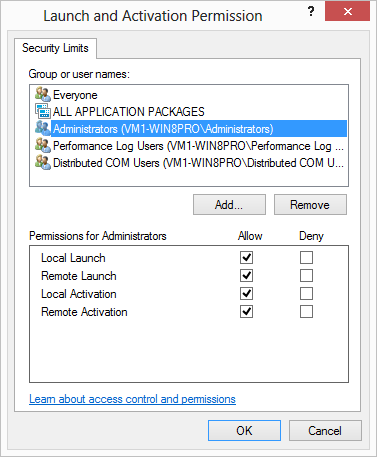
The list of
user accounts and groups included in the ACL is shown at the top.
Clicking on Administrators (for example) will show the
permissions for the Administrators group in the bottom half.
As seen, there are separate settings for local and remote
clients. Also, permissions to launch and activate are
separated. The former refers to permission to start a new process
hosting the component when one is not already running. The latter
refers to creating an instance of the component independent of
whether a server process is already running or not. A client which
has only activation permissions will not be able to create an
instance of the component unless the hosting server process is
already running.
The Edit Default… button for the section section brings up an identical dialog although accounts listed differ.
The dialogs for the Access Permissions section look similar but let us take a look at the system wide default permissions dialog shown in System-wide COM access permissions dialog anyway because we want to stress a point that will be relevant to our examples later.
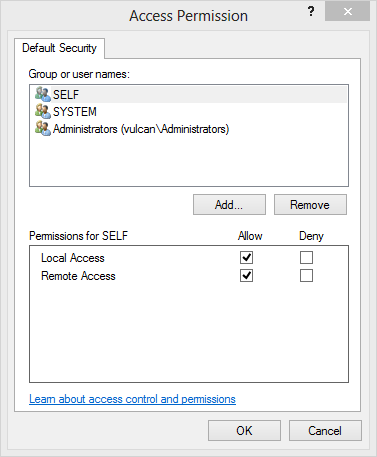
id_com_self_accountThis Access Permission dialog for configuring call security basically shows settings for remote and local access. What is to be noted are the settings for the account SELF. This account is not a real user account but rather refers to permissions granted to a client that is running under the same account as the server, whatever account that might be. Thus we see from the dialog that by default a COM server can be accessed from both locally and remotely by a client running under the same account.
|
|
There are two important things to note about the system-wide
default settings configured through First, although the group Second, group security policy settings can override registry settings. This is discussed further below. |
Again, like authentication and impersonation levels settings, we do not want to change system wide settings for our example. Instead we will show in the next section how to create settings for our specific component.
Setting limits through group policy
You can also use Windows Group Policy settings to control the
limits for both launch/activation as well as access
permissions through the MachineLaunchRestriction and
MachineAccessRestriction settings.
These settings will override any limits set through
through dcomcnfg.
When using the group policy editor, these settings are available
in Computer Configuration\Windows Settings\Security
Settings\Local Policies\Security Options. They are labeled as
DCOM: Machine Launch Restrictions and
DCOM: Machine Access Restrictions respectively.
We do not discuss these group policy settings further. For details see http://technet.microsoft.com/en-us/library/bb457148.aspx.
8.8.5. Component configuration example
Let us now use dcomcnfg to configure access and launch permissions that are specific to our component. Note again that this is necessary only if the default permissions are not sufficient.
We assume that our component has been registered on the server system as described in Implementing an automation component and can be invoked locally. We only need to configure it to allow remote access.
In the dcomcnfg Component Services window, select
the DCOM Configuration node in the left pane. This will show
the registered COM application names in the right pane. Scroll down
to where our application TclBook Bank Account is listed and
select Properties from the right-click menu as shown
in Configuring component-specific access.
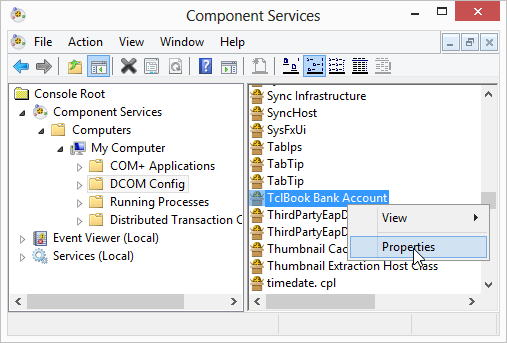
This will bring up the properties dialog for our COM application. shown in Configuring component permissions.
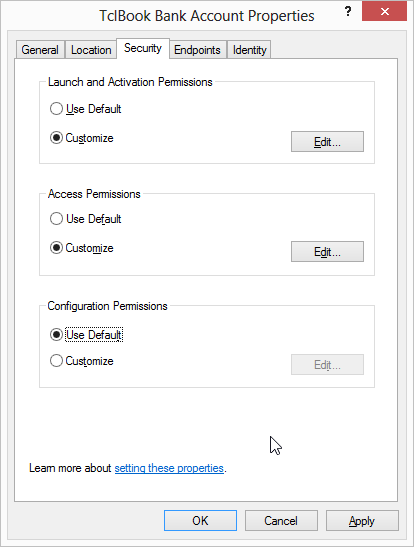
This dialog has the following five tabs:
-
The General tab shows metadata about the COM application, such as its name and AppID. The authentication level setting for the component can be configured here if the system default is not acceptable.
-
The Location tab allows choosing the computer on which the component should be run. When configuring a client system that is to transparently access a remote COM server, this can be set to the location of the remote server as described in Remoting via the registry. When configuring the server system, as we are doing now, we leave the setting at its default value to run locally (on the server).
-
The Security tab deals with component activation and access permissions. This is what we are interested in for our example and is discussed in detail later in this section.
-
The Endpoints tab allows configuration of additional transport protocols and ports over which DCOM runs. For example, you may want to configure the ports used by DCOM to a specific range that is passed through a firewall. Generally there is no need to change the default settings.
-
The Identity tab controls the identity under which the COM server will run as discussed in Server identity. For this example, we will leave the identity setting at its default value The launching user which means the server process will run under the same account as the client process.
Let us now go ahead and configure the activation and access control permissions that will allow us to access our component from a remote system. To do this, we need to select the Customize radio button for the Launch and Activation Permissions and Access Permissions sections in the Security tab as shown in Configuring component permissions and click on the corresponding Edit… buttons to set up the access permissions for each. This will bring up the ACL editing dialog shown in Configuring component launch permissions.
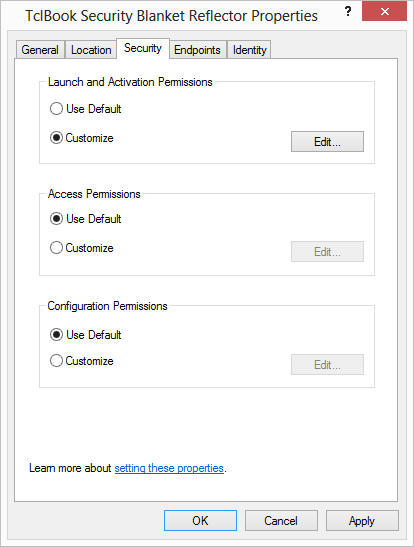
When setting permissions, we could choose to add permissions for
the specific account that we will use to remotely access the component
or we could add permissions for a group containing the account. In
either case, to successfully access the component, both the custom
ACL and the system wide limits we described in
Setting access control defaults and limits must allow the access. Because we
prefer not to modify any system wide limits, we will choose
a group that is already allowed by the system wide
limits and add that to the component’s launch ACL. Since the
the Distributed COM Users group is permitted by the system-wide
limits, we add that to the component ACL by typing its name
in the dialog that is shown when you click on the
Add… button. Then we select Distributed COM Users
as shown in Adding component launch permissions and
enable all checkboxes to allow local and remote launch and activation.
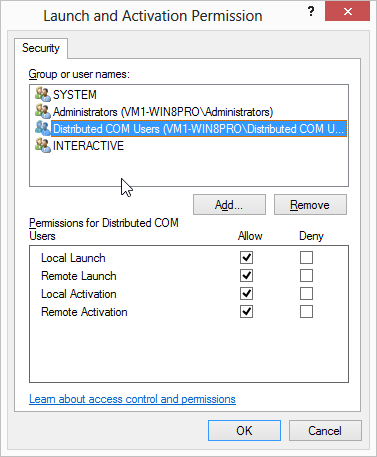
This configures the system to allow our component to be
launched from a remote client that authenticates itself
with the credentials of any account belonging to the Distributed
COM Users group.
|
|
Although you may remove other entries from the list of permitted
accounts for a component, you must make sure the SYSTEM account
is always present and has all the required permissions. Otherwise,
the component launch will fail.
|
That takes care of configuring activation security but what about call security? Do we need to configure that as well?
The answer for our example is no, because the system defaults are sufficient. As we pointed out earlier, the system-wide default permissions already allow remote access from clients that present the credentials for the account the server is running under (identified as SELF in System-wide COM access permissions dialog). For this example, we left the settings in the Identity tab at its default value of The launching user. This means the server will be started with under same account as the client and hence the default permissions suffice. In our next example, we will see how to handle the situation where the server and client run under different accounts.
There is one final step that must be done and that is to add the
user account to the Distributed COM Users group if it is not
already present. You can do this using the standard Windows
administration tools, or from Tcl itself using the TWAPI
command twapi::add_member_to_local_group on the server system.
twapi::add_member_to_local_group "Distributed COM Users" vmuser | vmuser is the name of the account we are using in our example |
The component is now configured for remote access. We try it from a client system. Because the component is not registered on the local system, we have to use its CLSID instead of the PROGID.
% set server vm1-win8pro
→ vm1-win8pro
% set clsid "{BEBFAC7C-B178-4479-B63B-EF5C6E47B600}"
→ {BEBFAC7C-B178-4479-B63B-EF5C6E47B600}| Our remote server |
We need to prompt the user for the user account and password for the remote server.
% lassign [credentials_dialog] username password
→ 0
% set credentials [com_make_credentials $username $server $password]
→ vmuser vm1-win8pro tAPjT>c2| Prompt user for credentials | |
| Note password is encrypted |
Now we actually instantiate our bank account object, initialize it and verify operation.
% set obj [comobj $clsid -system $server -credentials $credentials \
-authenticationservice ntlm]
→ ::oo::Obj222
% $obj initialize client-000
% $obj withdraw 100
% $obj balance
→ 999900
% $obj -destroyCompared to the local access example we showed in
Implementing an automation component, notice that we did not change the
server code and only had to add some additional options on the
client side call to comobj. Even these client side options are
not necessary if the client system was configured through the
registry to access the remote system by default as described in
Remoting via the registry. In that case, just
set obj [comobj $guid]would have sufficed just as for local component instantiation.
Component configuration summary
Although we gave a long-winded description of configuring security for remote access, much of that was background information. The actual steps were not many and we summarize them here.
-
Configure the Windows firewall to allow RPC if not already done. See the links in Troubleshooting DCOM and security for details.
-
Add the user account to an appropriate group (
Distributed COM Usersin our example) -
Configure the component to launch as the connecting user
-
Set up activation and launch permissions for the component to include the group
8.9. Programming secure access
In the previous section we showed how secure remote access to a component is done purely through configuration and without any coding.
Security settings from a client perspective are usually done
in this fashion. Although it is possible in theory to also
configure these through the registry, unlike components, client
programs do not register themselves and therefore configuration
via the registry or dcomcnfg is rare.
Why would a component want to specify settings programmatically? An example would be a component that wants to ensure all data is sent encrypted irrespective of how the system defaults or component registry settings are configured (or misconfigured). Another would be a situation where security parameters are dynamically changed based on factors such as client identity, location etc.
|
|
Only call security settings can be controlled programmatically. As discussed earlier, launch and activation security cannot be controlled programmatically as the component is not even running at the time they have effect. |
The following can be programmatically specified:
-
the authentication service providers that may be used for communication (by both client and server sides)
-
the minimal authentication levels for protecting client-server communication (by both client and server components)
-
the access control settings that control which user accounts can invoke methods on the component (server only)
-
the impersonation level that control the extent to which the server can use client credentials (client only)
These settings are then used as described earlier in Security blanket negotiation.
Programs can set these security settings either on a process-wide basis or in a more fine-grained manner for access to specific objects and methods. In the latter case, they can even be changed dynamically, for example, to raise the level of protection when communicating sensitive data.
8.9.1. Programming process-wide security settings
A component or a client can programmatically configure security
settings that should be used for all COM interaction in the process
by default. The benefit of process-wide configuration is that you
do not need to explicitly remember to manage security on a per
object basis. For example, by setting process-wide authentication
levels to privacy, a client can require all communication be
encrypted without having to explicitly specify it for every object.
In Tcl this process-wide configuration is done by calling
twapi::com_initialize_security.
There are some important points to note about this command:
-
It can be called at most once per process. Subsequent calls will result in an error being generated.
-
Calling the command is optional but it must be done before any kind of COM access, whether as a client or a server. If the call has not been made before COM is accessed, the system will implicitly make the call using the values configured in the registry as described in the previous section. A subsequent call to
com_initialize_securitywill fail for the above reason. -
The command is applicable to both the component server and the client though some of its options are specific to one or the other.
|
|
A library that depends on COM should not call this command and depend on process-wide defaults because the application itself might have called it with different settings |
The com_initialize_security command takes several options, some
of which we illustrate in our example later. For a full list,
see the TWAPI documentation.
8.9.2. Customizing security blankets for objects
When instantiating a COM object in the client process, it is
possible to specify security blanket settings that differ
from the process-wide values set by an explicit or implicit call
to com_initialize_security. This is done through options passed to
the comobj command when instantiating the object.
Some options will be illustrated in our example and the full list of security blanket related options is documented in the TWAPI reference.
Our example will also illustrate that security blankets can even
be changed “on the fly” through the -securityblanket option
of an object after it has been instantiated.
8.9.3. Controlling impersonation
As discussed in Client identity and impersonation, a server may choose to impersonate the client when accessing resources. Conversely, the client may choose the manner and extent to which the server can impersonate it. Both these aspects are programmatically controlled.
On the client side, setting impersonation restrictions is done through the security blanket commands described in the previous section.
On the server end, the component can take on the identity of the
client issuing the incoming call by invoking the
twapi::com_impersonate_client command. The component can revert
to its own identity at any time during the call by invoking
twapi::com_revert_to_self. Even if the component does not call
this command, the impersonation only has effect for the duration
of that particular call. The COM subsystem automatically reverts
back to the component’s identity when the call returns.
8.9.4. COM security programming example
With all that under our belt, let us now look at our second example. For the purpose of demonstrating security calls, we will implement a COM component that merely reports back various security related information. It differs from our previous (simpler) example in that it demonstrates
-
Running under a specific user account as opposed to that of the launching user
-
Impersonation of the client
-
Programming and inspecting the security blanket
The component will let us try out different options from the client side and see the effect on the security blanket.
As in the previous example, load the TWAPI package and define the CLSID, PROGID and AppID for the component.
package require twapi

set config {
    clsid  "{5ACF5C15-340F-4059-97E4-3C4CA0C8AFB7}"
    progid "TclBook.SecurityBlanketReflector"
    version 1
    dispids  {0 getblanket}
    appid "{E83F2F1B-2B08-4044-8F6F-20348F95EF2D}"
    appname "TclBook Security Blanket Reflector"
}
Next, implement the class which carries no state and therefore
needs no constructor.
It only has a single method - getblanket - which returns the
security blanket on the connection. A single parameter controls
whether the method impersonates the client or not. This will
allow us to examine how impersonation affects the call.
oo::class create SecurityBlanketReflector {
    method getblanket {{impersonate 0}} {
        if {$impersonate} {
            twapi::com_impersonate_client
        }
        try {
            set result [twapi::com_query_client_blanket]
            dict set result -user [twapi::get_current_user]
            return [twapi::tclcast string $result]
        } finally {
            if {$impersonate} {
                twapi::com_revert_to_self
            }
        }
        return $result
    }
}
Our main routine to run the component differs from our first example
in only one respect, but it is an important one. Because we will
run under a specific account, vmadmin, and not the account of
the launching caller, we need to set up access permissions. Hence
we have added the call to setup_access_permissions which we have
defined below. Note that this call must be made before any other
calls related to COM.
proc run {} {
    variable config
    interp bgerror {} ::background_error_handler

    setup_access_permissions
    set factory [twapi::comserver_factory [dict get $config clsid] [dict get \
        $config dispids] {SecurityBlanketReflector new}]
    $factory register
    twapi::start_factories
    $factory destroy
}
To understand the role of the setup_access_permissions procedure
that we define next, let us reiterate one more time the sequence
of security checks involved in instantiating and calling
an object. The first check is made by the system to verify that
the client can launch and activate the component. We took care that
we pass this check when we configured launch permissions using
dcomcnfg earlier. Once the component is running subsequent checks
are made for every access using a different ACL which
we have not accounted for these yet. In our
previous example, the default system-wide permissions were sufficient
as we had configured the component to always run under the account
of the caller. In this example, we have configured the component to
always run as vmadmin but want it to be accessible from clients
running under different accounts. The default permissions therefore
do not suffice.
This ACL can be configured programmatically with the
com_initialize_security command and will override any
dcomcnfg-configured registry settings even if present.
(Note however that the system-wide limits ACL is still enforced.)
We set up a security descriptor that allows access to the
SYSTEM account and any users belonging to the Distributed COM Users
group as before. We then pass this descriptor to com_initialize_security
to set up access permissions. Just for illustrative purposes, we also
require that all access be made with at least an authentication level
of packetintegrity.
proc setup_access_permissions {} {
    set allowed_accounts [list SYSTEM "Distributed COM Users"]
    set rights [list com_rights_execute com_rights_execute_local \
        com_rights_execute_remote]
    set dacl [twapi::new_restricted_dacl $allowed_accounts $rights]
    set secd [twapi::new_security_descriptor -dacl $dacl -owner vmadmin -group \
        "Administrators"]
    twapi::com_initialize_security -secd $secd -authenticationlevel \
        packetintegrity
    return
}
We could have taken an alternative approach to setting up these permissions
by using dcomcnfg to set up access permissions just as we did launch
permissions. Then instead of the setup_access_permissions procedure
we can call com_initialize_security as follows:
twapi::com_initialize_security -appid [dict get $config appid]
Instead of explicitly providing the security descriptor, we
provide the application id using which the COM libraries lookup
the dcomcnfg-configured registry to pick out the configured ACL.
Either approach is acceptable.
The remaining code is boilerplate that is more or less identical to our previous example so we do not describe it further.
The full listing is shown below.
# comsecurity.tcl
package require twapi

set config {
    clsid  "{5ACF5C15-340F-4059-97E4-3C4CA0C8AFB7}"
    progid "TclBook.SecurityBlanketReflector"
    version 1
    dispids  {0 getblanket}
    appid "{E83F2F1B-2B08-4044-8F6F-20348F95EF2D}"
    appname "TclBook Security Blanket Reflector"
}

oo::class create SecurityBlanketReflector {
    method getblanket {{impersonate 0}} {
        if {$impersonate} {
            twapi::com_impersonate_client
        }
        try {
            set result [twapi::com_query_client_blanket]
            dict set result -user [twapi::get_current_user]
            return [twapi::tclcast string $result]
        } finally {
            if {$impersonate} {
                twapi::com_revert_to_self
            }
        }
        return $result
    }
}

proc run {} {
    variable config
    interp bgerror {} ::background_error_handler

    setup_access_permissions
    set factory [twapi::comserver_factory [dict get $config clsid] [dict get \
        $config dispids] {SecurityBlanketReflector new}]
    $factory register
    twapi::start_factories
    $factory destroy
}

proc setup_access_permissions {} {
    set allowed_accounts [list SYSTEM "Distributed COM Users"]
    set rights [list com_rights_execute com_rights_execute_local \
        com_rights_execute_remote]
    set dacl [twapi::new_restricted_dacl $allowed_accounts $rights]
    set secd [twapi::new_security_descriptor -dacl $dacl -owner vmadmin -group \
        "Administrators"]
    twapi::com_initialize_security -secd $secd -authenticationlevel \
        packetintegrity
    return
}

proc background_error_handler {msg error_dictionary} {
    variable config
    twapi::eventlog_log "[dict get $config progid] error: $msg" -type error
}

catch {wm withdraw .}

set ::argv [lassign $::argv command]

switch -exact -nocase -- $command {
    -embedding -
    /embedding {
        if {[catch {run} msg]} {
            twapi::eventlog_log $msg -type error
        }
    }
    -regserver -
    /regserver {
        dict with config {
            twapi::install_coclass_script $progid $clsid $version [info script] \
                -scope system -appid $appid -appname $appname
        }
    }
    -unregserver -
    /unregserver {
        twapi::uninstall_coclass [dict get $config progid] -scope system
    }
    default {
        error "Unknown command. Must be one of /regserver, /unregserver or \
            /embedding"
    }
}

exit
Having written the component, let us now put it to use. As before, we first need to register the component. Unlike the previous example, we will do this on the client system as well as on the server system. The former is not strictly necessary but we do it as a convenience so we can refer to the component PROGID on the client as well. Registration is done the same way on both systems.
d:\src\tcl-on-windows\book> tclsh scripts/com/comsecurity.tcl /regserver
Once registered, we need to use dcomcnfg in the same manner as
before on the server system to permit accounts in the
Distributed COM Users to remotely launch and activate the
component. We do this exactly as described in
Component configuration example, this time selecting
the TclBook Security Blanket Reflector and configuring
its launch permissions as shown in
Configuring TclBook.SecurityBlanketReflector launch permissions.
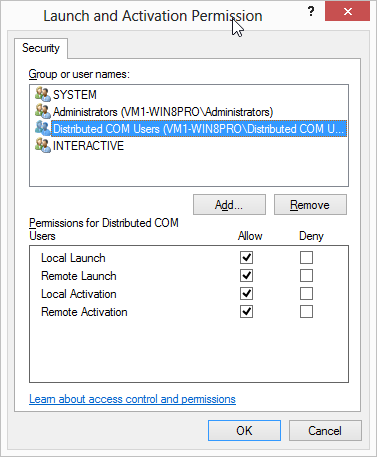
Note we do not change any of the Access Permissions settings since we are taking care of that programmatically as we have seen.
In addition, we will configure the component to run under a specific
user account vmadmin. This is done through the Identity
tab on the same dialog shown in Configuring TclBook.SecurityBlanketReflector identity.
We select the This user option and enter the account
and password.
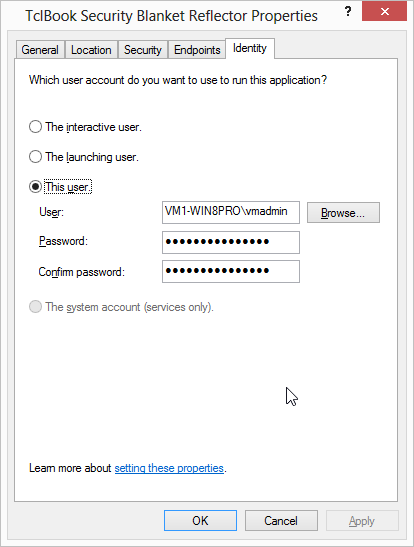
We are now ready to play around with the component and see how the security blanket is programmed. Note all these commands are invoked on the client system.
Again, we will first prompt the user for the credentials to use on the remote server.
% set server vm1-win8pro
% lassign [credentials_dialog] username password
→  0
   % set credentials [com_make_credentials $username $server $password]; # Note...
   vmuser vm1-win8pro tAPjT>c2
We can use the TclBook.SecurityBlanketReflector PROGID to instantiate
the object because we have registered it on the client system as well.
% set obj [comobj TclBook.SecurityBlanketReflector -system $server -credentials \
    $credentials -authenticationservice ntlm]
→ ::oo::Obj76
We ask the component for the security blanket. The parameter 0
indicates that server should not do impersonation.
% print_dict [$obj -call getblanket 0]
→ -authenticationlevel     = packetintegrity
  -authenticationservice   = ntlm
  -authorizationservice    = none
  -clientprincipal         = vm1-win8pro\vmuser
  -cloaking                = none
  ...Additional lines omitted...
Make note of the following points regarding the returned data:
-
The
-authenticationlevelfield is set topacketintegrity. This was the minimal level we specified in our call tocom_initialize_securityin our component. -
The
-clientprincipalfield isvmusercorresponding to the credentials presented by the client to the server. -
The
-serverprincipalfield isvmadminbecause we had configured the server to run under that account. -
The
-userfield which corresponds to the security token under which the method call is run isvmadminbecause we had configured the component to run under that account and we had specified in our call to run the method without impersonation.
Let us repeat the call but this time we will ask the component to return the settings when it is impersonating the client.
% print_dict [$obj -call getblanket 1]
→ -authenticationlevel     = packetintegrity
  -authenticationservice   = ntlm
  -authorizationservice    = none
  -clientprincipal         = vm1-win8pro\vmuser
  -cloaking                = none
  ...Additional lines omitted...
Notice the output has changed in only one respect. The -user
field indicates that the method was now run under the security
token for the vmuser account. Any access to resources will be
done under those credentials.
The -serverprincipal is
unchanged as it reflects the account the server is running under
irrespective of impersonation.
Now assume we want to make a call that will return sensitive data
so we wish to change the communication to use encryption.
To do this we need to create a new security blanket specifying
and authentication level of privacy and place it on the object.
|
|
Any options we do not specify for the blanket will stay unchanged except for credentials which we need to include everytime. If left unspecified, the security blanket will contain the credentials of the current thread which is not want we want for our example. |
% set blanket [com_security_blanket -authenticationlevel privacy -credentials \
    $credentials]
→ 0xffffffff 0 1 {} 6 0 1 {vmuser vm1-win8pro tAPjT>c2} 0x800
Now we can attach the new security blanket to our COM object and repeat our call to check the new settings.
% $obj -securityblanket $blanket
% print_dict [$obj -call getblanket 0]
→ -authenticationlevel     = privacy
  -authenticationservice   = ntlm
  -authorizationservice    = none
  -clientprincipal         = vm1-win8pro\vmuser
  -cloaking                = none
  ...Additional lines omitted...
Notice that the authentication level reported by the server has
changed to privacy indicating that all further communication
will be encrypted.
We are done so let us cleanup
% $obj -destroyAssuming we do not want the component to remain installed, we remove it by calling its unregistration command as below on all systems where you registered it.
d:\src\tcl-on-windows\book> tclsh scripts/com/comsecurity.tcl /unregserver
8.10. Troubleshooting DCOM and security
Because there are a whole bunch of things that can go wrong in getting remote access to work, this section lists some common issues that may arise that prevent access and provides some hints for troubleshooting.
|
|
These tips are directed towards troubleshooting connectivity issues where an authorized client cannot access a server. You must also ensure that in the process of fixing access issues, you do not land up opening up the server to unauthorized clients as well. |
If you are getting errors like
RPC server unavailable
it is most likely that either the remote server name cannot be resolved or that network connectivity issues, including firewalls, are blocking access. (Remember that COM communication takes place over RPC.) Follow the troubleshooting guide at http://social.technet.microsoft.com/wiki/contents/articles/4494.windows-server-troubleshooting-the-rpc-server-is-unavailable.aspx for detailed troubleshooting instructions. Additional useful information about Windows firewall settings to permit RPC and name resolution is available at http://technet.microsoft.com/en-us/library/cc732839(v=ws.10).aspx, http://technet.microsoft.com/en-us/library/cc947809(v=ws.10).aspx and http://technet.microsoft.com/en-us/library/cc738971(v=ws.10).aspx.
Note that the executable that implements the server component
(generally your tclsh.exe or wish.exe executable for components
implemented in Tcl)
must be permitted to receive incoming connection.
In order to run a server under any account, that account is
required to have the SeBatchLogonRight privilege. You can verify
this through the MMC Users and Groups plug-in.
Use dcomcnfg to verify that
-
The component or system default permissions, as the case may be, permit access to the client, and
-
Independent of the above, the launch and access limits for the system also permit access
Remember both of the above must be satisfied before access is allowed.
id_com_administrators_limits
You will find that the Administrators group is listed in the
system-wide permissions settings by default and therefore
reasonably expect that a client presenting credentials belonging
to an member of this group on the server would be allowed access.
How naive of you to expect things to work reasonably!
Although the group Administrators is listed with all
the appropriate permissions, attempted remote access under a
local user
account that belongs to the Administrators group can
(and most likely will) fail with a “Access denied.” error.
This is because for remote access newer versions of Windows
(basically those implementing User Account Control) will by default
downgrade the admistrative account rights to a standard user
account. This behaviour apparently does not affect domain
accounts that belong to the Administrators group.
To change this behaviour, the registry key
HKLM\SOFTWARE\Microsoft\Windows\CurrentVersion\Policies\system\LocalAccountTokenFilterPolicy
can be set to a value of 1. The author strongly recommends
against this kind of action that has a global effect on the system
unless there is no alternative.
A better solution is to not use the Administrators group for access
but instead
create a specific group (or add the account to Distributed COM Users)
for remote access instead.
However that does not help if you actually
want to do additional operations remotely that require administrative
privileges. See the Microsoft knowledgebase article
http://support.microsoft.com/kb/951016.
Moreover, if your require unauthenticated remote COM access (never a good idea), additional registry changes may be required. See the Microsoft TechNet article http://technet.microsoft.com/en-us/library/cc781010(v=ws.10).aspx.
You may have verified your component permissions, and that you are not affected by the administrative account issues above, and therefore expect that everything will now work. But it doesn’t! You forgot about group policy settings!
Remember if those group policies are enabled, the access limits there
override the ones configured in the registry
with dcomcnfg and any set programmatically by the component
So verify those are correct if you are using
group policies.
You can enable logging of access control errors in COM. This can be tremendously useful because the log messages often pinpoint the cause of the errors. The log messages indicate
-
whether system defaults or component-specific settings are being used
-
what account identities are being seen by the COM subsystem
-
whether the failures are related to activation security or call security
-
whether failures are caused by the permissions or limits ACLs
Logging is off by default. To enable logging, set the registry
DWORD values shown in COM logging registry settings under the key
HKEY_LOCAL_MACHINE\SOFTWARE\Microsoft\Ole.
The messages are logged to the Windows event log. Check both the application and system event logs for relevant messages.
Further details about the use of these settings is available at http://msdn.microsoft.com/en-us/library/windows/desktop/ms687309(v=vs.85).aspx.
9. Final words
COM is one of the most useful pieces of technology in the Windows world because so much software provides access to its functionality through COM. Examples include
Native Tcl interfaces, when available, are likely to be preferable to COM for performance reasons when interfacing to operating system facilities. In cases where these are not available, COM very often provides a very convenient fallback mechanism. And in terms of interoperation with other applications, COM is the de facto technology of choice.
10. References
- EDD1999
-
Inside COM+ Base Services, Eddon, Eddon, Microsoft Press, 1999. Excellent introduction and reference for COM from a C++ perspective.
- SDKCOM
-
Component Object Model, Windows SDK documentation.
- SDKCOMSEC
-
Security in COM, Windows SDK documentation.